
Tongue and Groove Ceiling Installation Made Easy: A Step-by-Step Guide
Tongue and groove ceiling installation gets a lot easier when you stop treating the ceiling like one big piece of work. The sequence matters more than a fancy tool: inspect the room, confirm what you are fastening into, plan the first and last rows, establish a reference line, then install one controlled course at a time.
My short answer: most bad ceiling installs do not go wrong because somebody lacked a specialty tool. They go wrong because the room was not checked, the layout was not settled, the first course wandered, or a small problem got forced instead of fixed.
Herb’s Rule of Thumb: Do the thinking on the floor. The more decisions you settle before you climb, the less time you spend fighting boards over your head.
Free 10-Page Field Guide
Catch the Mistake While It Is Still a Decision
Get the free T&G Project Starter Guide for the planning, setup, installation, and hard-stop checks that are cheapest to fix before finished boards cover them up.
No purchase required. One practical T&G starting guide.
Tongue and groove ceiling installation: the job in order
- Inspect the room and ceiling assembly.
- Confirm framing, backing, fixtures, access, and anything that interrupts the field.
- Condition and inspect the material as the manufacturer requires.
- Measure the field and work out the starter and finish courses.
- Establish one straight reference line you can trust.
- Install and recheck the first course before production starts.
- Fasten for the actual board and ceiling assembly.
- Keep checking joint fit and drift as the field grows.
- Cut openings and transitions before the board is trapped in place.
- Plan seams instead of letting scraps decide where they land.
- Fit the last course like finish carpentry.
- Finish and inspect the perimeter before calling the ceiling done.
That is the whole job in one pass. The details matter, but the order keeps you from solving tomorrow’s problem with today’s mistake.
1. Start with the ceiling assembly, not the first board
Before material comes out of the stack, look at what is actually above you. Find the framing direction. Identify where you have solid fastening and where drywall is only a finish surface. Locate lights, fans, vents, beams, access panels, crown, borders, and anything else that interrupts the field.
Check the plane too. A ceiling can look flat from the floor and still have a hump, sag, framing change, or poorly placed backing that telegraphs through the finished wood.
Access belongs in this decision. A small room may be reasonable from ladders. A larger or higher ceiling may be faster and safer from platforms or scaffolding. Long boards get harder to control when your feet are in the wrong place.
If the room still needs the broader planning work — layout direction, access, material handling, finish timing, and waste — use the T&G Prep & Planning guide before this installation sequence.
2. Condition the material and inspect the boards
Real wood moves. The exact conditioning or acclimation requirement depends on the product, species, finish, moisture conditions, and manufacturer. Follow the instructions for the boards you actually bought instead of borrowing a generic number of days from somebody else’s job.
While the material is staged, sort it. Separate boards with damaged tongues, split ends, severe twist, ugly defects, or finish problems. That does not mean every board needs to be furniture-perfect. It means you decide where a questionable board belongs before you are standing overhead trying to make it work.
Keep usable offcuts until the job is finished. Some become short finished pieces. Others become tapping blocks, protectors, setup pieces, or test cuts. Throwing them away early only limits your options later.
If material quantity is still in question, the tongue-and-groove ceiling materials calculator guide is the better place to work through takeoff and waste before installation starts.
3. Work out the starter and finish rows before fastening
Measure the ceiling across the direction the courses will travel and compare that with the actual installed exposure of the board. You are trying to avoid ending the room with an ugly narrow strip that is hard to cut, hard to fasten, and obvious from the floor.
If a full first course creates a poor finish course, change the starting width before you drive the first fastener. Balance the field where it makes visual sense. Beams, borders, crown, walls, and the main sightline can all affect that decision.
Do this math now. Once several courses are installed, the room has already made part of the decision for you.
4. Establish one reference line you can trust
Walls are not automatically straight, square, or parallel. Pick the line that matters to the finished room and establish a reliable reference with measurements, a chalk line, a level, a laser, or a combination of them.
The tool matters less than the fact that the line has been verified.
The first course has to relate to that reference. If you simply push the first board against a crooked wall and follow it, every later course can inherit the same error.
5. Take extra time on the first course
The first course sets the pace for everything after it. Make sure the line is right, the board is seated correctly, the ends are where you want them, and the fastening is actually reaching the intended structure or backing.
Then stop and look at it from the room.
If that first course is wrong, adding more boards does not average the mistake away. It just makes the correction harder to reach.
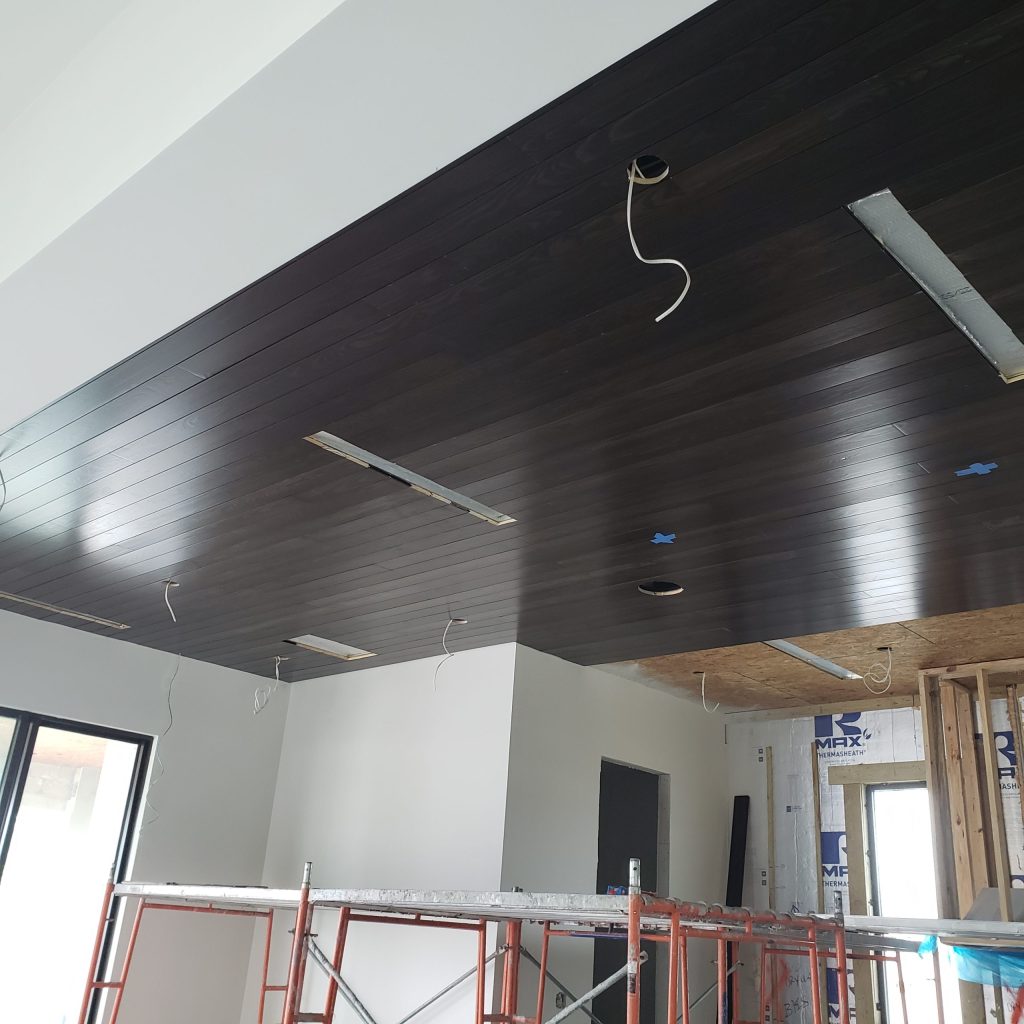
6. Fasten for the actual board and ceiling assembly
Fastener gauge, length, material, angle, spacing, and location are not universal. They depend on the tongue-and-groove product, board thickness, substrate, framing, exposure conditions, and manufacturer instructions. Blind-nailing through the tongue is common on many profiles, but use the method required for the material in front of you.
For the real-wood ceiling work covered on this site, I often prefer the stronger-holding 15-gauge finish-nailer lane when the product and assembly allow it. That is a working preference, not a universal fastening specification.
Whatever gun you use, depth matters. You want the fastener set without crushing the tongue, splitting the board, or leaving the next groove unable to seat.
For the full cordless-versus-pneumatic decision, use the tongue-and-groove ceiling nail-gun guide.
7. Seat each board without forcing the joint
A tapping block and rubber mallet can help bring a joint home, but force should not be your diagnosis.
If one board suddenly needs much more effort than the others, stop. Inspect the tongue, groove, end joint, finish buildup, debris, cut, obstruction, and accumulated drift.
Driving a stubborn board harder can bruise the profile, split a groove, push the field off line, or create damage that does not show until the next course refuses to fit.
8. Check drift while it is still small
Do not wait until the far side of the room to find out whether the field is walking.
Measure back to your reference periodically. Watch the reveal at visible walls, beams, borders, and other straight lines.
Small corrections spread over several courses can disappear. A large correction shoved into one row usually advertises itself. The goal is not theoretical perfection. The goal is a finished field that reads straight and intentional from the room.
Watch the fastening sequence
Video: How to Install Tongue and Groove Ceiling Boards – WindsorONE by Finish Carpentry TV.
Use the video to see the work in motion. Use the instructions for your actual boards and ceiling assembly for fastening details.
Want the full tongue-and-groove install order in one place?
I put the layout checks, prep work, tool judgment, fastening sequence, and common mistake fixes into one practical PDF handbook so you are not guessing your way through the job.
9. Cut fixtures and penetrations deliberately
Lights, vents, electrical boxes, speakers, fans, and other openings are where rushed work gets expensive.
Confirm the location before cutting. Know what the trim ring or cover will hide and what it will not. Mark from a reliable reference instead of guessing from the previous board.
A jigsaw, hole saw, oscillating tool, drill, or another cutting method may be appropriate depending on the opening. Choose the method around the cut and the fixture instructions. Do not turn every cutout into a freehand gamble.
Dry-fit before fastening when the opening is tight or difficult to recover from.
10. Plan seams instead of letting scraps plan them for you
If the room requires end joints, think about where they land, how they are supported, and how they read across the field.
Do not create a repeating stair-step pattern by accident, and do not put joints wherever the offcut happens to fit if that creates a weak or ugly layout.
Use the board lengths you have intelligently. Good material management reduces waste without making the ceiling look like it was designed around leftovers.
11. Treat the last course as finish carpentry
The last row may need to be ripped to width, fitted around an out-of-square wall, or installed with less room to maneuver than every course before it. That is why the starter-row planning mattered.
Measure the actual remaining space in more than one location. Do not assume the far wall is parallel.
Rip and fit the board so the visible face and trim relationship look clean while still respecting the movement space and fastening method required by the product.
The last course is not where you want to discover that the first-course math was ignored.
12. Finish the perimeter without using trim to hide a bad field
Crown, border trim, beams, stops, or other perimeter details can finish the room and cover the movement space designed into the assembly. They should not become an excuse for sloppy cuts or a field that drifted badly.
Clean pencil marks. Check joints. Correct damaged edges while you can still reach them. Set any proud fasteners that can be corrected safely.
Then step down and look at the whole ceiling. Finish carpentry is read from the room, not from six inches away on a ladder.
The core tool kit for this installation
You do not need a truck full of specialty tools. You do need a dependable setup for measuring and layout, controlled cutting, product-compatible fastening, safe access, and small fit-up work.
A practical kit usually includes:
- tape measure, pencils, square, and a reliable layout line
- miter saw or another controlled crosscut setup
- a saw capable of clean rips when the first or last course needs one
- jigsaw or oscillating tool for detail cuts and penetrations
- the fastening tool required by the board and assembly
- tapping block or sacrificial offcut and a rubber mallet
- drill/driver and the bits or hole saws the fixtures require
- stable ladders, platforms, or scaffold appropriate to the room
If your board and assembly allow a 15-gauge finish nailer, current cordless examples include the DEWALT DCN650B and Milwaukee 2839-20. Those are examples, not a reason to replace a capable tool you already own.
For the full by-task breakdown, use the tongue-and-groove ceiling installation tools guide.
Stop and fix these problems before they spread
A ceiling usually tells you when something has changed. Pay attention when it does.
Stop and diagnose the job if:
- a joint suddenly needs much more force to close
- the reveal to a wall, beam, or border is changing faster than expected
- a tongue is splitting or being crushed by the fastener
- boards start rocking because the plane or backing is wrong
- an opening no longer lands where the layout said it would
- the last-course width is shrinking into a problem you did not plan for
- a seam pattern starts repeating in a way the room will notice
Do not use the next board to bury the evidence. Fix the cause while the correction is still small.
Common installation mistakes to catch early
The failures that cost the most time are usually not complicated:
- following a crooked wall instead of a verified reference
- skipping starter- and finish-course math
- assuming drywall alone is structural fastening
- using one generic nail rule for every product and assembly
- forcing joints that should be inspected
- waiting too long to check drift
- cutting fixture openings before verifying location
- letting random offcuts dictate seam layout
- using trim as the recovery plan for a field that already ran out of control
For a deeper breakdown of why these problems happen and how to correct them, see the common tongue-and-groove ceiling installation mistakes guide.
Bottom line
A clean tongue-and-groove ceiling is built from controlled decisions. Verify the room. Plan the field. Protect the first line. Fasten into the right structure. Check drift before it becomes obvious. Treat openings and the final course like finish work instead of afterthoughts.
The boards are the visible part. The layout and sequence are what make them look right.