Why Accurate Measurements Matter
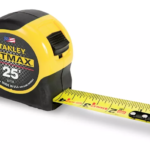
Installing a tongue-and-groove (T&G) ceiling requires precision. The right measuring tools ensure clean cuts, tight board alignment, and professional results. Two must-have tools in every trim carpenter’s pouch are the Stanley Fatmax 25’ Tape Measure and a simple #2 Pencil.
Stanley Fatmax 25’ Tape Measure: Built for Pros
Features & Benefits
✅ Durable Design: Reinforced casing and blade coating for longevity.
✅ Long Reach: 11-foot standout allows one-person measurements.
✅ High-Visibility Markings: Easy-to-read fractions and bold numbers.
✅ Ergonomic Grip: Comfortable to hold, even for extended use.
Why I Use It for Ceiling Installations
- Accurately measures board lengths before cutting.
- Easily spans large ceiling areas without bending.
- Tough enough to handle job site conditions.
📌 Pro Tip: Lock the blade and double-check measurements before cutting to prevent waste.
Check Price on Amazon ➡️ Fat Max Tape Measure
#2 Pencils: The Simple Yet Essential Tool
Features & Benefits
✅ Sharp & Precise: Makes fine, accurate marks.
✅ Erasable: Adjust measurements without permanent mistakes.
✅ Budget-Friendly: Cost-effective and reliable.
Why I Use It for Ceiling Installations
- Marks cut lines on T&G boards without damaging the finish.
- Used for layout planning before securing boards.
- Works well on various wood types and finishes.
📌 Pro Tip: Use a carpenter’s pencil for rough marks and a sharp #2 pencil for detailed cut lines.
How I Use These Tools for Ceiling Installation
1️⃣ Calculate Square Footage & Linear Feet for Trim – I measure the total ceiling area to determine the number of T&G boards needed and calculate the linear footage required for trim.
2️⃣ Measure for Blocking (Additional Framing) – Using the tape measure, I determine where extra framing is needed to properly secure T&G boards, ensuring a solid installation.
3️⃣ Plan Board Layout for a Balanced Finish – I measure and mark the ceiling to ensure the starter and finish rows are equal in size, or at least that the last row is no smaller than 2 inches wide.
4️⃣ Ensure Every Board Lands on a Rafter Center – Precise measurements help align each board perfectly with the rafters, preventing weak spots or improper attachment.
5️⃣ Measure for Cutouts & Protrusions – I take exact measurements for lights, ceiling fans, speakers, outlets, security cameras, and any unique project elements to ensure clean, professional cuts.
6️⃣ Align Ceiling Lights Properly – I check that recessed lighting is centered on a board or perfectly between two boards for a symmetrical, aesthetically pleasing finish.
7️⃣ Ensure Trim Boards Fit Tight – A precise tape measure ensures the trim boards fit perfectly, eliminating unsightly gaps.
📌 Pro Tip: If using multiple tape measures, test them side by side. Some tapes can vary by up to 1/8″, which can lead to cumulative measurement errors.
Final Thoughts
The Stanley Fatmax 25’ Tape Measure and #2 Pencils are simple but indispensable tools for tongue-and-groove ceiling installations. Precision starts with proper measurements, and these tools ensure your work is accurate and efficient.
🔗 Ready to upgrade your toolkit? Check out this tool today! ➡️ FatMax Tape Measure
My second choice would be ➡️ Milwaukee Tape measure


