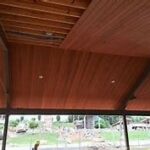
If you’re tackling a tongue-and-groove ceiling, you need the right tools to make the job smooth and frustration-free. I’ve been there, up on a step ladder, wrestling with boards that won’t quite fit or nails that don’t hold. So, trust me when I say, having the right setup makes all the difference.
The Right Nail Gun
Forget the hammer—if you’re installing a T&G ceiling, a pneumatic or cordless finish nail gun is the way to go. I personally use the Milwaukee cordless finish Nail Gun because it delivers a strong hold without splitting the wood. What a game changer using a cordless nail gun is, not having a hose to move around or trip over, constantly. get tangled are caught on something. Having the freedom to move around and keep it on your tool belt makes it safer and easier. If you’re working with thinner boards, Milwaukee M18 FUEL 18-gauge Brad Nail gun is a great choice. Milwaukee’s cordless nail guns are reliable, durable, and have no ramp up time. Feels and sounds like a pneumatic without the hose or air compressor.
A Sturdy Step Ladder (or Scaffolding)
Working overhead for hours? A wobbly ladder isn’t your friend. If you’re doing a small area, a solid Werner step ladder will do, but for larger ceilings, I highly recommend Metal Tech mason scaffolding (5ft wide x 7ft long). It keeps you steady, saves your back, and speeds up the process.
3. A Reliable Miter Saw
Every board needs a clean, precise cut. A compound miter saw makes life easier, especially when dealing with tricky angles around walls. I started with a basic saw, but now I use the DeWalt 15-amp double bevel compound sliding miter saw, which makes my cuts cleaner and joints tighter. It’s used to Chamfer the butt joints to match the board style and look or angle cut the butt joints to hide the butt joints on unfinished T&G boards, for cutting the trim boards for clean, smooth, and precise cuts.
Tapping Block & Mallet
T&G boards don’t always slide into place easily. A rubber mallet and tapping block let you snug them up without damaging the edges. I prefer the Estwing rubber mallet because it provides the right amount of force without marring the wood or damaging the tongue of the boards, The tapping block (beater block) is just a 6-8″ scrape of the T&G board, you use it by putting the groove over the tongue and hit it the block with your hammer. This will protect the new boards, and the beater block is easily replaced when no longer useable. It’s also used on stubborn boards or warped boards that need extra leverage to get a tighter fit.
Measuring & Marking Tools
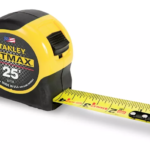
This one seems obvious, but don’t underestimate a good measuring tape, carpenter’s square, and chalk line. One bad measurement can throw off your whole row, and fixing mistakes on a ceiling. Not fun. I always rely on my Stanley FatMax 25’ Stud Tape Measure, speed square, DeWalt chalk line (blue), and a #2 pencil for marking precise cuts. I use these tools for ceiling layout, board sizes needed, cutting around lights, speakers, outlets, fans, vents, and so on.
Other Saws needed
For various cuts, I use the **DeWalt XR jig saw to cut around the lights, speakers, fans, outlets, vents, so on. The DeWalt XR circular saw used when on the scaffolding and need adjustment cuts on the butt ends that begin or end on the wall side of a row. The DeWalt 8.25” 15-amp table saw is for long rip cuts needed for the starter row or finishing row. Using the guide rail, you can make multiple boards the same width size accurately. If you need to make custom trim or cut a 1’x4′ board in half equally this is the tool for the job.
Drills & Impact Drivers
I always have my Milwaukee M18 FUEL 1/4-inch impact driver and Milwaukee M18 FUEL hammer drill on hand for pre-drilling holes and driving fasteners. There is always lights, fans, outlets, speakers, or vents that need to be taken down and/ or moved, then reinstalled.
Extension Cords
For powering all these tools, I use a combination of 25ft, 50ft, and 100ft extension cords with 3-way plug-in adapters. I have 400 feet of extension cords because I work on many new construction houses and power is never near the ceiling that needs to be installed.
Final Thoughts
If you’re serious about installing a T&G ceiling, having these tools will save you time, effort, and frustration. I learned the hard way, so you don’t have to. Ready to gear up?
Check out the Milwaukee M18 FUEL 15-Gauge Cordless Nail Gun | Get the DeWalt 15-Amp Sliding Miter Saw | Metal Tech mason scaffolding
Let’s get that ceiling looking great!
Got questions? Drop them in the comments! Enjoy the Day, Herb.